
SPRING SPLASH
We purchased Rainbow in the winter, so we started with a clean canvas in the spring. The amount of time you want to invest on different aspects of boat preparation is quite up to you. We go for an early May launch date which means we can never complete our entire to-do list by that date. We always have plans to do stuff while in the water, but that time invariably is filled with either sailing, socializing or relaxing!

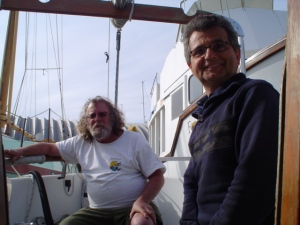
Boat Yard: We start our spring boat maintenance program usually just before the water supply is turned on at the marina. Generally, we are there on weekends without washroom facilities and we always have to ask them to start to keep the washrooms open for the weekend users. Unless they change their policy this year, the boat store isn’t opened on weekends until a lot later in the spring, so we have to be proactive in remembering to bring or buy elsewhere everything we would need for the day. If not, a drive to the local hardware store takes up at least 30-45 minutes of our time. While I work inside, Michael putters around attacking little jobs here and there. He sometimes uses a dry eraser to buff off any hull stains. See also my article/rant on Boat Yard Etiquette. In 2020 amongst COVID we moved our boat to one marina that is at a resort for the summer and another new marina for us for the winter storage.
List of items to take to the boat the first day of spring boat work:
- jugs of hot water (which cools down to warm once we are there)
- liquid cleaner
- dish washing detergent
- furniture polish
- Penofin Marine Oil
- rolls of blue shop towels
- SOS pads (or similar)
- dry erasers
- small sponges
- disposable gloves (I go through several pairs a day)
- hand towels
- beverages and snacks
- portable vacuum (whisk broom and dust pan are already in the boat)
- pressure washer, hoses, extension cords
- paint brushes, paint sponges, containers and solvents
WORKING INSIDE THE BOAT
Cleaning: The first step involves cleaning both the inside and the outside of the boat. I am in charge of the inside while Michael works on the outside. We are both very social people, and Michael has the best opportunity for chatting at ground level. It seems there are a lot of people who come to the marina for that purpose only, as they don’t start their own maintenance until after we are launched! There are times, when Michael invites visitors to the “upper quarters” so I can take a break and socialize for a bit. Notice from this picture, I am still in the cabin! Cleaning the inside is imperative and I have seen people do little or no maintenance to the outside prior to putting their boat in the water and sometimes they wait to do the inside while sitting at the dock. Once we are in the water, I just want to enjoy myself. My preference is to have it ready, loaded and provisioned prior to launch. We were very lucky when we purchased Rainbow, as she hadn’t been in the water for several years. She was spotless. I have heard horror stories from boat owners of the condition of their boat, when purchased. But there were other preparation seasons which I wasn’t as lucky.

Winter Water Damage: Preventive cleaning in the fall will help deter mold build up over winter. I learned that on our second spring clean up. Strategically, placing open bins of charcoal is another way to lessen the build up of mold. In 2020, I learned of a product from our power boat friends, called DampRid. Thee bags in one package. I put two on the boat and one in our basement at home. It gathers the moisture securely into a bag, leaving the boat with a pleasant fresh smell in the spring. Originally, Michael kept insisting the mold build up wasn’t bad that year, but I was totally disgusted and swore I would never let it get like that again. The following spring we had a water intake problem (the cockpit wasn’t draining due to the positioning of the boat on the jack stands, and an opening into the engine room from a hatch allowed water to enter the bilge) resulting in a flood and freeze of 4-6 inches of solid ice built up over the floor boards. Plumber’s antifreeze prevents water in the bilge from freezing, but once it gets high enough to go over the floorboards, forget it! We had to do a thaw out, then wood refinishing long before I started to clean. But ice deters mold from forming. There was a plus side to that unfortunate incident.
Tea Tree Oil and SOS Pads: My cleaning method starts with, first I wash down all surfaces inside the boat with a Melaleuca product, Melamagic, diluted in water. Melaleuca products contain tea tree oil, which inhibits bacteria and mold from forming. If I found a lot of mold for instance in and around the toilet I might add bleach into the detergent solution. Toilets just gross me out anyway. Washing inside cupboards won’t take too long, if the fall cleaning is done thoroughly beforehand. One thing I often neglect at haul out, is a thorough cleaning of the oven and stove top, so SOS pads come in handy in the spring. I also scour the stainless steel sink.
 Icebox: I can’t reach the bottom of the icebox easily. I am just short of 5’2″ and one of the reasons (there were many others) we wanted a Vancouver 25 was because with my height, I could barely work with a corner style icebox, which most sailboats have. I understand the design, it is space efficient, but you have to be someone tall to reach into the bottom of a corner location. Rainbow’s icebox is next to the stove behind the door to the head and then to our bedroom. Closing the door, gives me full access to the icebox. Well almost. I still can’t touch the bottom of it. So cleaning was a bit of a problem. In the spring of 2014, a brilliant idea hit me. I just purchased a brand new toilet brush for the boat. It hadn’t yet been used so I grabbed it, placed a cleaning cloth underneath and discovered I made a perfect extension and an easy cleaning tool! I now keep it permanently in the icebox where it resides on the top metal rack.

Towels, Finish Oil and Polish: Usually, the first cleaning day should go smoothly so at the end of the wash down, I bring out the Penofin marine oil , I now use Teak Oil, which I use both inside and outside on the wood finishes. I wear disposal gloves and old clothing for this job, as this product will not come out of clothes. I pour a small amount of oil on a blue shop towel (lint free) and rub it over areas on the walls that look worn. Wait 20 minutes and wipe off the oil residue. If the floor needs to be done, then I do the same there. I place pieces of shop towels on top of the floor to walk or kneel on. Just before I leave for the day, I make sure that each surface on the floor is buffed a bit, so that there are no signs of embedded prints. If the floors need several coats, we bring home the hatches and teak grid from the head’s floor to perform this task at home. Since the floor has been oiled before, there is no sanding required. When we bring everything back to the boat, it gives us a surface to walk or kneel on while doing the remainder of the floor. But if no water damage is done, then one coat should be sufficient. The next visit back to the boat, I spray the woodwork with Melaleuca furniture polish, Rustic Touch, for extra protection and to bring back luster and shine to surfaces not oiled. It doesn’t do any harm to coat the oiled areas but don’t spray it on the floor. All of this can be done as early as March in Nova Scotia, Canada.
Blue Shop Towel Warning: We had a major blockage in our toilet once. Michael had to dive to clear out a piece of blue shop towel from the seacock. Not nice. I used them as rags or quick cleaning towels in the head and we figure that one of those must have fallen into the toilet one night and was “flushed” down. The process blew out the toilet and it was old enough that parts were no longer available so the toilet had to be replaced. These towels are not water soluble! (updated 8 Jan 2017)

Additional Heat: We purchased a heater that we attach to a smaller sized propane tank and place in the sink for safety reasons. It gives off enough heat (along with the built in furnace being on) to keep inside the cabin well above room temperature even with the companionway hatch open! The boat soaks up the heat and any over the winter dampness quickly disappears. These heaters are available at many places and range from $35-$50. We purchased this one at Princess Auto. We also had one once which was purchased from Costco.

Water and Bilge: Once there is no longer any sign of a deep freeze (usually in April) things really start to pick up in the boat yard, after the water is hooked up. Series of water hoses are connected, interconnected and overlapping each other in the yard. They soon share the space with the various electrical cords. This now easy accessible water can be a delight to any youngster playing at ground level. Michael first re-connects the water hoses to the pump and quickly fills our empty water tanks. We haven’t treated the tanks yet but plan to in 2017 by adding water treatment tablets, letting them sit with filled water, following instructions, pump out and fill again with fresh water. We replaced the vinyl water tank at one point. We pump out the bilge making sure the bilge pump is working properly. After I finish cleaning, I dump the soapy water into the bilge just to give a sudsy affect. For some reason, I adore seeing bubbles pumping out on the ground below. (updated 8 Jan 2017)
Boatyard Socializing: Once water is hooked up, it seems the boatyard is now in full swing. This is when the real sharing/socializing begins! Working in the boatyard is the one time of year, that you can meet new people, talk to old friends, share stories and knowledge with both seasoned and new boaters. It is an opportunity to gather information and share your acquired skills. Passing out boat “business cards” now becomes routine. We love showing off new products we found over the past year. There is often a bit of loaning and borrowing of tools going on. Remember, if you liked what you borrowed and will use it again, don’t borrow it more than once but buy your own! Also, remember to return items promptly, and most importantly to keep track of who you lend items too. If they aren’t returned in a reasonable amount of time, ask about them. Once the boats are in the water and leave for their homes, you may never see these people again until the following spring. We lent our pressure washer to a friend, who left it with the yard workers to store in their shed. By the time we retrieved it, it was damaged as we believe either the yard workers used it, or someone borrowed it from them. A lesson learned. Never trust a third party to look after your stuff! (updated 8 Jan 2017)
Provisioning: Please refer to pages titled: “What to Take on Board,” “What and Where to Eat,” “Fashion Statement,” and “Other Useful Stuff” to get ideas of what to add to the boat. I like to put most of it on board while Rainbow is still on jack stands in the boatyard. Once the boat is in the water the distance means loading up carts moving them down sometimes steep ramps and to a berth. Adding things in the yard is the easiest! First the mattress cushions are added, then the hard goods (items and electronics) and followed by soft goods (food, bedding and clothing). It means a lot of hauling things upwards, but a lot less walking and pushing carts.
Working Outside on the Hull

Stain Removal: Michael first pressure washes the boat. He then has a three part method he uses to clean the hull. He first uses Davis FSR fiberglass stain remover to get rid of any stains. It is a blue/grey gel compound with a mild and insignificant smell. In 2014, it was available at the Yacht Shop for $11.99. It goes a long way.
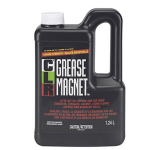 Another option for stain removal is CLR Grease Magnet. We purchased a bottle in 2016 but haven’t used it yet. It is about a $1.00 less than the FSR and goes a lot further. Although available at many types of hardware stores, they don’t seem to have large quantities in stock. Will give ours a try soon. (updated 8 Jan 2017)

Oxidation Removal: Once the stains are removed, then Michael uses Meguiar’s Marine/RV Oxidation Remover heavy duty cleaner to remove the white powder caused by oxidation. He used half of a 473 ml/16 fl oz bottle in one season. It is a cream coloured liquid with a slight solvent smell. As of 2014, it is available at the YachtShop for $13.95.

Waxing: Once the anti-oxidation process is complete, he uses Garry’s Royal Satin, Marine & RV One-Step cleaner wax. The directions state to apply with a clean damp cloth on a pre-washed boat, which he has done by hosing her down. Once this product is applied in a circular motion, let dry to a haze and use a buffer or just elbow grease to create a high gloss shine. Voila! The result is a glistening boat! I haven’t been able to find this product locally in Nova Scotia. We purchased it while in Saint John, NB at Millidgeville Marine. This store doesn’t seem to have online order capabilities, but the price was $20.75. By the look of what we used in the jar, a little will go a very long way.
Painting: After all the cleaning is done, he then tapes the hull to paint the bottom, and uses a full 4L can of Amercoat ABC #4 blue. The price varied seasonally from $150-$160/can. If it isn’t too cold, as cold weather makes the paint thicker, there is enough in one can to complete the hull, including adding touch ups just prior to the launch. In July, 2013, Amercoat marine products was acquired by PPG Dulux. The paint now appears to be called PPG ABC#4. Only time will tell, this spring as to how easy it will be to obtain! 2014 note. We were still able to get our original bottom paint. Old stock but on the more pricey end. We also ordered a thinner especially for the paint, which helped to get the job done in the colder temperatures. We ended up not having to borrow someone else’s paint to do those last minute touch ups from the jack stand patches just before launch. We even had some left over. Dec 2014 note. Watch for boat store end-of-year specials! We picked up our bottom paint for less than we ever paid before! Michael is now looking at getting a water based bottom paint but it is about $100 more than the traditional brands. In 2016 we purchased a high-end roller brush to paint the bottom. Specifically designed for strong chemical paint and doesn’t cause breakdown of the brusher as well as doesn’t absorb and waste the paint. It was purchased at a Sherwin-Williams Commercial paint store. (updated 8 Jan 2017) In 2021, we purchased water soluble bottom paint and I painted with a brush only the areas that no longer had paint. We also painted the bottom of our dinghy with the same pain.
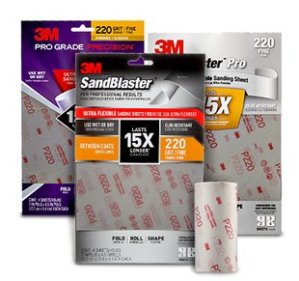 Bright Work: While Michael is working on the hull, the increased temperatures and bright sunshine pulls me out of the cabin and back into the fresh air. I usually keep the propane heater on, and the heat rising up from below increases the cockpit temperatures even more. As our previous product (Cetol) is not all removed from the boat, I sand by hand any areas which are peeling. I discovered in 2016 3M flexible sandpaper. It is plastic not paper based and can be used wet or dry. They state it lasts 15x longer than traditional sandpaper. I won’t let Michael near it and save it entirely for doing the bright work. I can sand around curved wood with ease and it doesn’t tear easily. I found the product at a commercial Sherwin-Williams Paint Store. After sanding, I clean with a tack cloth then apply the
 Penofin Teak Oil to the wood. I started using Teak Oil in 2019 realizing it was easier to apply and looked nicer. I don’t tape, and only use a spare shop towel to clean up any spillage. Applying oil over the Cetol doesn’t hurt, so the oiling process is very easy and isn’t at all tedious. The Penofin Oil is tinted though, which darkens the wood. That was one of the main reasons we stopped using it, the wood became too dark. The more coats applied the lighter it remains. Each season the blackness can be easily sanded way to fresh wood. The Teak Oil lasts now more than one season. It was the smartest move. Although, we don’t seem to have a lot of wood on the boat, it does take time and I give it as much time as I can, applying coats, waiting 20 minutes and wiping off the excess, then repeat the process, once dried. (updated 8 Jan 2017)

Dinghy: We used to power wash the dinghy leaving on barnacles that weren’t easily removed and scraped them off in the spring. As we live in a country that has snow in the winter, I discovered the perfect apparatus for removing barnacles is a snow scraper for a car! Currently, we no longer have any spring prep for the dinghy except possibly adding some air. Everything is now easily done in the fall, even without a pressure washer. (updated 8 Jan 2017)
Mechanics: Michael has procedures which he follows each season for engine, batteries and such. After 7 years, I finally nailed him down to prepare the list.
- Remove blanket and cover from the engine.
- Install the drain plugs in the filter and exhaust.
- Install a new impeller.
- Connect the inlet water hose for the engine.
- Tighten the previously loosened alternator belt.
- Reconnect batteries to engine.
- Check all electrical connections on engine.
- Check oil levels on engine and transmission. (Oils are changed after the launch). (updated 8 Jan 2017)

Launch: All I do is sit back and watch. Rain or shine. Rainbow is moved from the jack stands to the trailer, then placed on the travel lift. From there she is launched into the the water. I used to always film the launch. Not sure why, but I thought it is such a slick event, that I didn’t mind watching it more than once! Just before she goes into the water Michael gives the now exposed spots which were hidden under the jack stands a coat of bottom paint. If I haven’t done so already, I climb aboard and drop the fenders. Once the boat is in the water, Michael moves it to an available berth, where she is tied up. I like to go back to winter resting spot, to clean up any garbage and gather up any stuff we left behind, including our folding ladder. It always feels so lonely there, after the boat is in the water. It is just like when you move, and you stand in that empty house looking around, and it seems so very strange. The hustle and bustle of the spring maintenance is now behind us and we look forward to 6+ months of sailing!


One thought on “Preparing for Launch”